## 一、前言
确保已有条件:
- linux服务器,可使用本地虚拟机
- mysql服务,以5.7版本为例([安装教程](https://blog.csdn.net/qq_43284469/article/details/115773735?ops_request_misc=%257B%2522request%255Fid%2522%253A%2522162651202216780265463084%2522%252C%2522scm%2522%253A%252220140713.130102334.pc%255Fblog.%2522%257D&request_id=162651202216780265463084&biz_id=0&utm_medium=distribute.pc_search_result.none-task-blog-2~blog~first_rank_v2~rank_v29-3-115773735.pc_v2_rank_blog_default&utm_term=mysql))
二、数据库压测工具sysbench
一个非常好用的数据库压测工具,就是sysbench,这个工具可以自动帮你在数据库里构造出来大量的数据,你想要多少数据,他就自动给你构造出来多少条数据。
可以模拟几千个线程并发的访问你的数据库,模拟使用各种各样的SQL语句来访问你的数据库,包括模拟出来各种事务提交到你的数据库里去,甚至可以模拟出几十万的TPS去压测你的数据库。
三、在linux上安装sysbench工具
登上在你的linux的虚拟机或服务器,然后你可以用如下的命令设置一下yum repo仓库,接着基于yum来安装sysbench就可以了,安装完成以后验证一下是否成功。
1
2
3
| curl -s https://packagecloud.io/install/repositories/akopytov/sysbench/script.rpm.sh | sudo bash
sudo yum -y install sysbench
sysbench --version
|
![image]()
如果上面可以看到sysbench的版本号,就说明安装成功了。
四、数据库压测的测试用例
![image]()
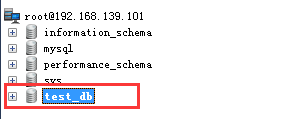
先用在数据库中创建一个库,这里就创建为test_db;
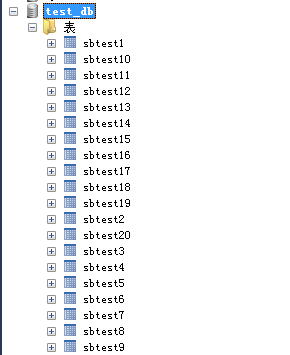
我们将要基于sysbench构建20个测试表,每个表里有100万条数据,接着使用4个并发线程去对这个数据库发起访问,连续访问2分钟,也就是120秒,然后对其进行压力测试。
五、测试指令
1
| sysbench --db-driver=mysql --time=120 --threads=4 --report-interval=1 --mysql-host=192.168.139.101 --mysql-port=3306 --mysql-user=root --mysql-password=123456 --mysql-db=test_db --tables=20 --table_size=1000000 oltp_read_write --db-ps-mode=disable run
|
上面构造了一个sysbench命令,大致意思了:
1
2
3
4
5
6
7
8
9
10
11
12
13
14
15
| --db-driver=mysql:这个很简单,就是说他基于mysql的驱动去连接mysql数据库,你要是oracle,或者sqlserver,那自然就是其他的数据库的驱动了
--time=300:这个就是说连续访问300秒
--threads=10:这个就是说用10个线程模拟并发访问
--report-interval=1:这个就是说每隔1秒输出一下压测情况
--mysql-host=127.0.0.1 --mysql-port=3306 --mysql-user=test_user --mysql-password=test_user:这一大串,就是说连接到哪台机器的哪个端口上的MySQL库,他的用户名和密码是什么
--mysql-db=test_db --tables=20 --table_size=1000000:这一串的意思,就是说在test_db这个库里,构造20个测试表,每个测试表里构造100万条测试数据,测试表的名字会是类似于sbtest1,sbtest2这个样子的
oltp_read_write:这个就是说,执行oltp数据库的读写测试
--db-ps-mode=disable:这个就是禁止ps模式
|
最后有一个prepare,意思是参照这个命令的设置去构造出来我们需要的数据库里的数据,他会自动创建20个测试表,每个表里创建100万条测试数据,所以这个工具是非常的方便的。
六、进行测试
以上的是prepare,就对数据的构造生成;
接下来就是测试,将其改为run
1、读写测试
oltp_read_write
1
| sysbench --db-driver=mysql --time=120 --threads=4 --report-interval=1 --mysql-host=192.168.139.101 --mysql-port=3306 --mysql-user=root --mysql-password=123456 --mysql-db=test_db --tables=20 --table_size=1000000 oltp_read_write --db-ps-mode=disable run
|
2、写测试
oltp_read_only
1
| sysbench --db-driver=mysql --time=120 --threads=4 --report-interval=1 --mysql-host=192.168.139.101 --mysql-port=3306 --mysql-user=root --mysql-password=123456 --mysql-db=test_db --tables=20 --table_size=1000000 oltp_read_only--db-ps-mode=disable run
|
3、删除测试
oltp_delete
1
| sysbench --db-driver=mysql --time=120 --threads=4 --report-interval=1 --mysql-host=192.168.139.101 --mysql-port=3306 --mysql-user=root --mysql-password=123456 --mysql-db=test_db --tables=20 --table_size=1000000 oltp_delete--db-ps-mode=disable run
|
4、更新索引字段测试
oltp_update_index
1
| sysbench --db-driver=mysql --time=120 --threads=4 --report-interval=1 --mysql-host=192.168.139.101 --mysql-port=3306 --mysql-user=root --mysql-password=123456 --mysql-db=test_db --tables=20 --table_size=1000000 oltp_update_index--db-ps-mode=disable run
|
5、更新非索引字段测试
oltp_update_non_index
1
| sysbench --db-driver=mysql --time=120 --threads=4 --report-interval=1 --mysql-host=192.168.139.101 --mysql-port=3306 --mysql-user=root --mysql-password=123456 --mysql-db=test_db --tables=20 --table_size=1000000 oltp_update_non_index--db-ps-mode=disable run
|
6、插入测试
oltp_insert
1
| sysbench --db-driver=mysql --time=120 --threads=4 --report-interval=1 --mysql-host=192.168.139.101 --mysql-port=3306 --mysql-user=root --mysql-password=123456 --mysql-db=test_db --tables=20 --table_size=1000000 oltp_insert--db-ps-mode=disable run
|
7、写入测试
oltp_write_only
1
| sysbench --db-driver=mysql --time=120 --threads=4 --report-interval=1 --mysql-host=192.168.139.101 --mysql-port=3306 --mysql-user=root --mysql-password=123456 --mysql-db=test_db --tables=20 --table_size=1000000 oltp_write_only--db-ps-mode=disable run
|
七、测试过程
按照我们上面的命令,我们是让他每隔1秒都会输出一次压测报告的,此时他每隔一秒会输出类似下面的一段东西:
![image]()
1
| [ 22s ] thds: 10 tps: 380.99 qps: 7312.66 (r/w/o: 5132.99/1155.86/1321.35) lat (ms, 95%): 21.33 err/s: 0.00 reconn/s:0.00
|
1
2
3
4
5
6
| thds: 10,这个意思就是有10个线程在压测
tps: 380.99,这个意思就是每秒执行了380.99个事务
qps: 7610.20,这个意思就是每秒可以执行7610.20个请求
(r/w/o: 5132.99/1155.86/1321.35),这个意思就是说,在每秒7610.20个请求中,有5132.99个请求是读请求,1155.86个请求是写请求,1321.35个请求是其他的请求,就是对QPS进行了拆解
lat (ms, 95%): 21.33,这个意思就是说,95%的请求的延迟都在21.33毫秒以下
err/s: 0.00 reconn/s: 0.00,这两个的意思就是说,每秒有0个请求是失败的,发生了0次网络重连
|
>这个压测结果会根据每个人的机器的性能不同有很大的差距,你要是机器性能特别高,那你可以开很多的并发线程去压测,比如100个线程,此时可能会发现数据库每秒的TPS有上千个,如果你的机器性能很低,可能压测出来你的TPS才二三十个,QPS才几百个,这都是有可能的
八、结果报告
另外在完成压测之后,最后会显示一个总的压测报告,我把解释写在下面了:
![image]()
1
2
3
4
5
6
7
8
9
10
11
12
13
14
15
16
17
18
19
20
21
| SQL statistics:
queries performed:
read: 0
write: 30162
other: 1837
total: 31999
transactions: 31999( 266.62 per sec. )
queries: 31999( 266.62 per sec. )
ignored errors: 0 (0.00 per sec.)
reconnects: 0 (0.00 per sec.)
General staticstics:
total time: 120.0132s
total number of events: 31999
Latency (ms):
min: 0.09
avg: 15.00
max: 1936.28
95th percentile: 61.08
|
sqlyog图:
![image]()
结合top等命令:观察机器的其他重要的性能指标,比如说CPU、网络、内存、磁盘
IO,等等。


![image]()


